Monday, 26 November 2012

Nail Art: Galaxy Nails

A long time ago in a galaxy far, far away...STAR WARS

Just kidding! Although these nails do look like something the Millennium Falcon would have encountered up there in outer space. 

Galaxy print is everywhere at the moment and I took inspiration from fabric prints on various dresses/bandeaus/leggings I have seen whilst browsing the internet at work. Initially, I thought these were going to be an absolute bitch to create, but they were surprisingly simple. So read on if you want these nails...


First off you'll need 3 tools, which most of you should have lying around the house...


Cocktail sticks/toothpicks, tweezers and foundation sponge broken up into small pieces.

The polishes I used:

MUA nail varnish in shade 2 - Black

Saffron London nail polish in shade 11 - White

Barry M nail paint in NP134 yellow (no longer available)

Collection 2000 Hot looks in shade 46 - Fruit Loop

w7 nail polish in neon Blue

Technic nail varnish in Carnival (see below)

(multi-coloured glitter...*sigh*)

I decided for this tutorial, as it's a bit more tricky, that I'd create a step by step picture guide to demonstrate how I achieved this look.


1. Start with a good base coat and paint your nails black

2. Pick up a piece of foundation sponge with the tweezers and dip it in white polish. 
Dab some off, you want to be sparing, and map out your nebula

3. Add yellow polish using the same sponge method to the inside of the nebula

4. Again with the sponge add a peachy pink in the very middle

5. Mix a blue polish with a drop of black or use navy to go around the edges of the 
nebula, blending it into the black.

6. Use a cocktail stick dipped in white polish to create clusters of stars in various 
places on the nail. Also add a couple of larger stars on each nail

7. Use a multi-glitter or fine glitter polish with a clear  base to give the illusion 
of more stars

8. Finish with a good top coat and voila!


Easy galaxy nails in 8 simple steps!


Happy polishing <3


Nail Art: Cherry-Licious

WARNING: THESE NAILS ARE NOT EDIBLE...which is a massive shame because my stupid allergies mean that I can't eat cherries (harrumpf), but I guess having them on my nails is the next best thing.

This manicure lasted me almost a week (I blame my new Sally Hansen top coat), and since I created this fruity design I've had people insisting that they were transfers/falsies. I'm not tooting my own horn but they look pretty damn good! Even better, they only took 30 minutes!

The polishes I used:

Saffron London nail polish in Shade 11 - White

Collection 2000 Lasting colour in 5 - Fire Engine

Barry M nail paint in NP284- metallic green (no longer available)


I started as always with a good base coat and then added a thick coat of white nail polish. I waited for it to dry completely before going in with a medium-large dotting tool to create the cherries. It is best to slightly overlap the dots to give a more realistic effect. You can do as few or as many cherries as you like, or you could paint all of your nails white and just have cherries as an accent nail on your ring finger &/or thumb.

Remember, the stalks/leaves go at the cuticle end of the cherries, so be sure to leave enough room.

For the leaves, I used the green polish on a tiny nail brush and just painted them on. The shape is just like a 'V' with a flick. I used the same tiny brush in the white polish to create the highlight. It is important to add these in the same place on each set of cherries to give the illusion of light hitting them.

I finished off with Sally Hansen's Hard as Nails base/top coat and voila, easy fruity nails which look good enough to eat!

Happy polishing <3

Friday, 23 November 2012

Nail Art: Candy Sunrise

Guys...I did it, I stepped away from the dotting tools and towards the foundation sponges. I've wanted to try gradient nails for ages, and I know i'm jumping on the bandwagon fashionably late, but hey.

I saw a picture of gradient nails using bright pink and blue, bit I wanted to use pastels. These nails remind me of fizzy bubblegum bottles...


The polishes I used:

Missguided nail splash in MissBehave

Barry M nail paint in 317 - Blue Moon


I started with two layers of Blue Moon which I left until it was almost dry. this technique works best when your base colour is still a bit tacky. Next I used a foundation sponge in the pink polish and dabbed it lightly about 3/4 of the way down the nail. I then did the same, adding another coat of pink halfway down and a third layer on the top quarter. I also added some pink from the brush on the very tips.

You have to work quickly here, and as soon as you've added the pink, you need to add a thick layer of clear top coat (i'm currently using Sally Hansen Hard as Nails as a base and top coat) which will blend the colours together nicely!

This one took practice, but I will definitely be trying it again with some different colours!

I hope you enjoy giving this a go!

Happy polishing <3

Monday, 19 November 2012

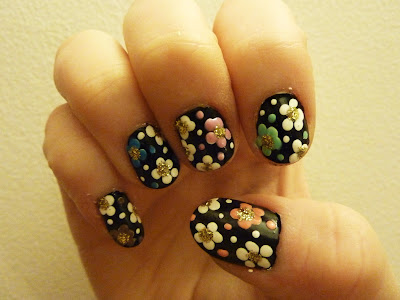
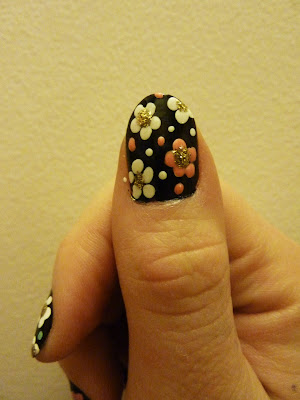
Nail Art: Daisy Dots

Dots dots dots. I just can't get enough of the little buggers. I've been doing so many designs with them that i'm seeing them in my sleep.  So I thought i'd induce one more night of dotty dreams before giving my tools a break and trying something new, and so far, this is my favourite!

Even though it is about 2 degrees most days, there's still sun when i'm walking to work at 8am, so therefore I have concluded it is still summer, and i'm clinging onto it with all of my might. Hence the inspiration for this nail design.

This one was pretty tricky, especially the right hand, and there was much room for error. I didn't want my flowers merging and ending up resembling a splat.

The polishes I used:

Barry M nail paint in NP47 (black)

Saffron nail polish in shade 12  - White

Barry M nail paint in Mushroom (brown)

W7 nail polish in Neon Blue

Missguided nail splash in MissBehave (pink)

Barry M nail paint in 304 - Mint Green

Collection 2000 Hot Looks nail paint in 46 - fruit Loop

W7 nail polish in Gold Dazzle


I started with a black base coat and then did the white flowers and dots. The coloured flowers and dots have white underneath them as I found this to help the colours pop. I finished with gold glitter in the centre of each flower.

I topped it all off with e.l.f.'s matte nail finisher, which doesn't really show up in the picture, but it's an optional step. Beware of matte designs as they usually chip after a day.

I'll definitely be doing this again soon, maybe with christmassy colours. I know it's only november, but the christmas Coca Cola advert is out so i'm allowed o:)

Happy polishing <3


Tools: Nail Art Brushes

In the words of The Mask..."somebody stop me". I am a woman obsessed. I have somehow ended up with a 15 piece nail brush set and several new nail polishes. I definitely didn't mean to accidentally on purpose click 'commit to buy'.

It doesn't matter though, because my new toys were an absolute steal. At around £2 on eBay, you can't really go wrong. I probably won't be saying that in a week when the bristles shed and I end up with a hairy nail design but come on...two quid?!

Here are the beauties...


Included is:

- a dotting tool
- fan brush x2
- angled brush x2
- flat brush x4
-fine brush x5
- angled fine brush

The quality isn't out of this world and they are synthetic, but I can't wait to play around with them and come up with some more interesting and intricate designs.

 There are several different sizes of each type of brush, so the world is pretty much my oyster. Well, it will be when I own the whole O.P.I. Nail Lacquer collection. Santa?

Friday, 16 November 2012

Nail Art: Nude Dots

Today is VERY busy in the office. So what better to do than blog...right? As long as i'm typing nobody will know that i'm slacking (reeheehee)

After my last nail design constantly distracting me with it's crazy colours, I decided to try something a little more toned down. My Grandma still thought it was "crummy" however. There's just no pleasing some people!

I used all 4 sizes of dotting tool for this one and as you can see there are bigger dots at the top which gradually get smaller. I did it quite randomly, with some dots going from top left to bottom right, some right to left and some quite central. It is also a good idea to do some half dots on the very tips of your nails which gives the illusion of a continuous design.

The polishes I used:

Missguided Nail Splash in MissCellaneous

Barry M nail paint in NP47 (black)


And don't forget lads and lasses, always use protection (base/top coat)

Happy polishing <3


*hello Movember mug*


Thursday, 15 November 2012

Nail Art: Disco Lights


First of all, excuse the Grandma in the background. I'm not entirely sure what she made of this nail technique, but huffing and puffing made up 90% of her response. She's way too old school for this 21st Century 'rubbish'. Her words.

So, on Tuesday my nail dotting tools, which cost a whopping £2.19, arrived. eBay. Go. You know you want to. 

My friends will tell you that I rush things, probably due to the multiple occasions they have witnessed me walk into doors/people/bushes etc, so very true to nature, I slapped on a ton of black nail polish without even re-doing my base coat (big no no unless you want lovely stained nails) and haphazardly dotted away. I like to think of myself as a bit of a modern day Georges Seurat. With breasts. 

The polishes I used:

Barry M nail paint in NP47 (black)

Barry M Nail Paint in 317 Blue moon

W7 Nail Polish in Lilac

Missguided Nail Splash in MissTify


This look is so simple as the nail dotting tools come with different sized ends, so it is really easy to achieve neat dots of varying size.


I chose a black base so the colours I used would stand out, but this would look good with loads of different combinations. I chose 3 colours that I thought worked well together for the dots, and did lines of different sizes/colours on each nail. 

Don't forget  a good base coat. I like to use Sally Hansen nailgrowth miracle. And use any clear polish as a top coat.

This look is definitely not uniform and there is room for variaton on each nail. I strongly suggest getting some of these tools and having a go :)

Happy polishing <3